Blockchain programming has become one of the best paying and challenging software spheres during the recent decade. Although blockchains are language-agnostic and many of the existing languages, like C++ and JavaScript (JS), are used by blockchain engineers, there are some tasks that couldn’t be conveniently realized by existing languages, which opened up the demand for new, crypto-specific options. One such language is Solidity.
Solidity was born as a core part of the Ethereum ecosystem. It absorbed C++, JavaScript, and Python. It has many contemporary features like libraries and inheritance. Solidity is designed to write programs that interact with Ethereum accounts, which are called smart contracts. Smart contracts are executed on Ethereum Virtual Machine (EVM), enabling users utilizing them perform tasks like crowdfunding, blind auctions, voting, and many others in a decentralized manner. The most famous killer-app of smart contracts was decentralized funding in ICOs, which started the bull rally on the crypto markets in 2017.
Whether you are an experienced developer or just starting out in crypto, it’s a good idea to start learning Solidity because smart contracts have become a crucial part of the blockchain ecosystem. Aside from being actively implemented by dApps, they are being actively integrated into infrastructure-layer blockchains and even in Bitcoin via providers like RSK. By knowing how to build smart contracts you will make your blockchain career more sustainable and be able to produce better quality solutions. Let’s not pull it off any longer and get our hands dirty with coding!
Understanding the basics of a smart contract
A smart contract account consists of three sections: balance, storage, and code. The balance represents how much Ethereum a smart contract has. Storage holds data like strings and arrays that are specific to an application. The code section has the raw machine code that is compiled from what we write in Solidity.
Unlike user accounts, smart contract accounts are not external to the respective networks. In other words, you can use your wallet with various networks like Kovan and Ropsten, but you can’t do this with a smart contract. Smart contracts are internal.
Each smart contract has a source, which is stored on an author’s device and instances, which are stored on the blockchain. In order to create an instance (account) of a smart contract, we need to deploy it to the network. It very much resembles the relationship between classes and instances in traditional object-oriented programming (OOP) and languages representing it (JS, Ruby). To give you a more visual representation, let’s create a class ‘Bike’ and add an instance of it.

What we will be writing is a contract definition, which will then run through a compiler that will produce two files: bytecode and application binary interface (ABI). Bytecode is what will be actually fed to the EVM and ABI is a layer between bytecode and regular JavaScript code that allows building a user interface (UI).
Choosing an IDE & version of Solidity
Before we start, we need a proper integrated development environment (IDE). In other terms, we need a convenient terminal with the necessary tools to write our code in. For the purposes of this tutorial, we will pick Remix, an IDE created by the Ethereum foundation that allows writing, testing, debugging, launching smart contracts and many more. You can use it either straight in the browser or download it locally if you would like.
Once you launch Remix, you will be presented with the code editor in the center, the file manager on the left, and a compiler on the right.
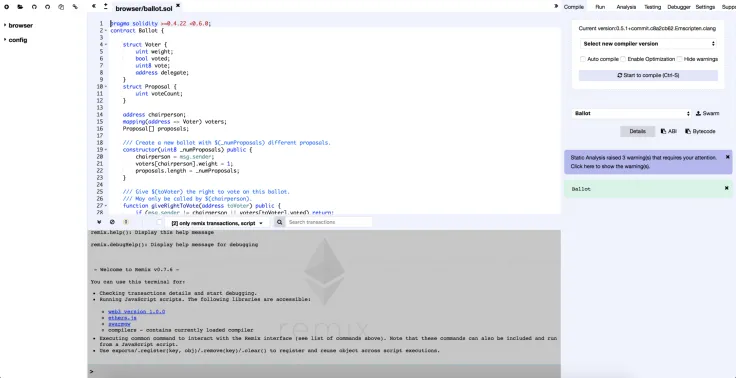
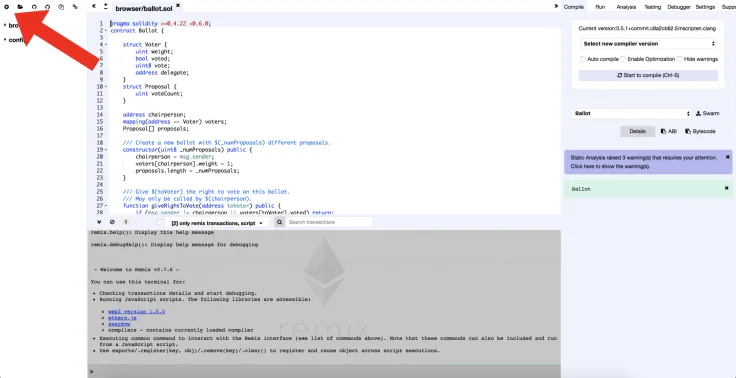
There will be some pre-written code – we won’t need that. To create out first-ever smart contract let’s press on the little plus icon in the top-left corner of the terminal and give it a name.
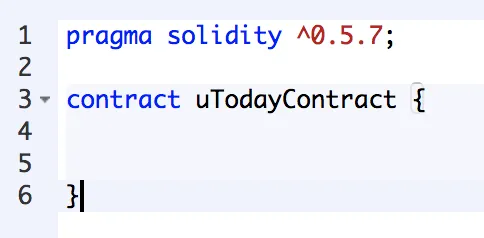
As we have the blank .sol document now, we should specify the version of Solidity that the compiler will run. At the time of this tutorial, the latest version is 0.5.7. If you are not sure which version to use, you can specify a range of versions.

Lastly, let’s give our smart contract a name, followed by a parenthesis.
Writing your first smart contract
Once we have our canvas ready, it’s time to define the basic building blocks – variables. While experienced software engineers will have no issues understanding this concept, we will briefly introduce it to beginners. Variables are placeholders for chunks of information that are later referenced by a program that runs them.
Let’s create a couple of variables: a string (a sequence of symbols) and an integer (a number). In Ethereum’s case, variables are stored in the blockchain along with the rest of parts of contracts and can, therefore, be accessed and updated from anywhere. Another key characteristic of Solidity variables is that you can make them private by writing ‘private’ next to the variables. Finally, for the integers, Solidity has two types: signed (can be positive & negative) and unsigned (can only be positive). To specify an unsigned variable, we should just put ‘u’ before it.
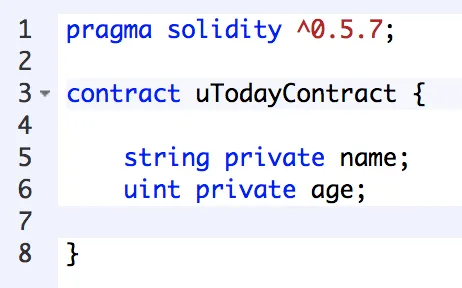
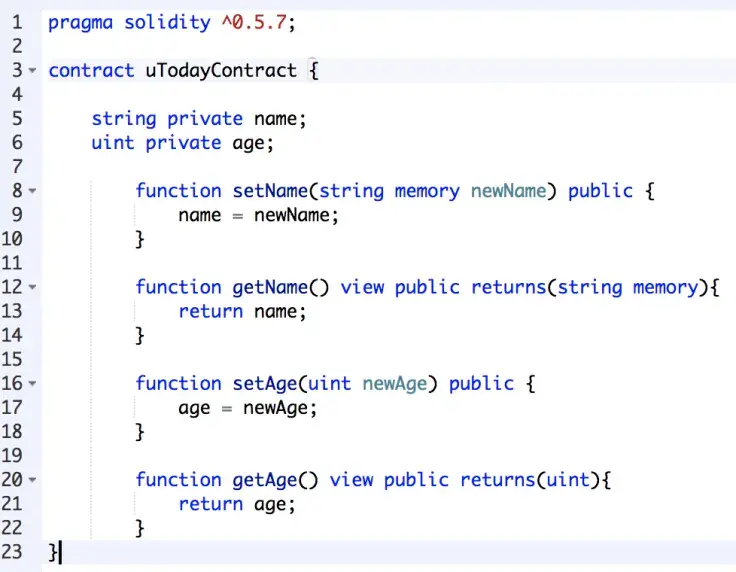
Once we have the ‘name’ variable, we need to write out the methods of setting and getting it. This looks like a JS function. Remember that Solidity is statically typed, so we have to define variable types. Now any value we put in the ‘setName’ will define the ‘name’ string. For the getter, we will use ‘getName’ and specify what variable we expect to see. Now, it’s time to do the same for the ‘age’ variable. The method is constructed similarly to the ‘getName’.
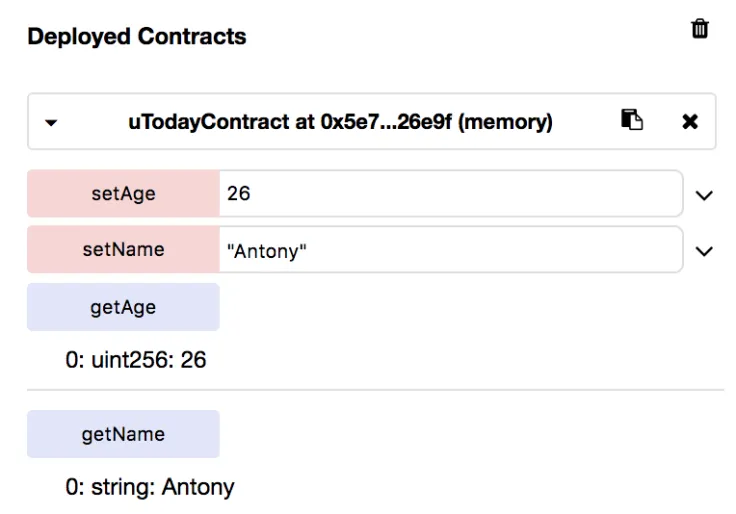
Let’s test our little chunk of code. Go to the ‘Run’ tab of the compiler and press ‘Deploy’ under your contract’s name. At the very bottom of the compiler, you will now see the ‘Deployed Contracts’ section that has our methods available. In order to pass a name to the ‘newName’ value, we need to make sure that our string is written in JSON, otherwise, the ‘getName’ will return nothing. For the ‘setAge’ just put your age without quotes. As you see, we can now set and receive the ‘name’ and the ‘age’ variables through our smart contract.
Defining Wei and Gas
One of the most remarkable features of smart contrasts is that to deploy them to the Ethereum network you will need to initiate a transaction, which costs some amount of money that is paid in Ether. It’s crucial to understand how the fees are utilized in the system, as they will be deducted each time you interact with EVM.
What’s Wei?
Let us assume that reading this far into our tutorial you have used Bitcoin at least once. You probably made a small transaction that was way less than 1 BTC. In that case, you used Satoshis, which are something like pennies for a dollar. Wei is like a Satoshi – it’s the smallest part of 1 Ether. If we think of it in programming terms, it’s the lowest unsigned integer in the network. While interacting with the network, you will mostly encounter Gwei, which refers to Gigawei and equals 1 billion Wei.
What’s Gas?
Gas is an essential part of the mechanism of smart contract execution. It has two values for each transaction: Gas consumed and its price. It’s worth mentioning that a user initiating a transaction defines these values. However, if the set value of Gas won’t be enough to process a specific operation, then the Gas will be consumed, but the transaction will fail. Moreover, if the price for Gas will be set too low for the network at a given time, the transaction will not be processed by the nodes, eventually making it unsuccessful. There are several services to check optimal values for your transactions, one of them being ethgasstation.info. To get a better understanding of Gas and why it costs any money, let’s code some of it by ourselves.
Get back to your Remix window and initiate a new file. In our example, we will call it ‘Gas’ and create a contract with the same name. Bear in mind that the more data we will require to store on the blockchain, the more Gas we will need. That being said, for the purpose of this tutorial we will create a cheap contract; the more you will add to it, the higher the fee will be.
There will be a function that returns an integer that is a sum of two inputs. To make it as lightweight as possible, we will specify that our contract will store nothing on the blockchain, and for that we will put ‘pure’ next to the function.
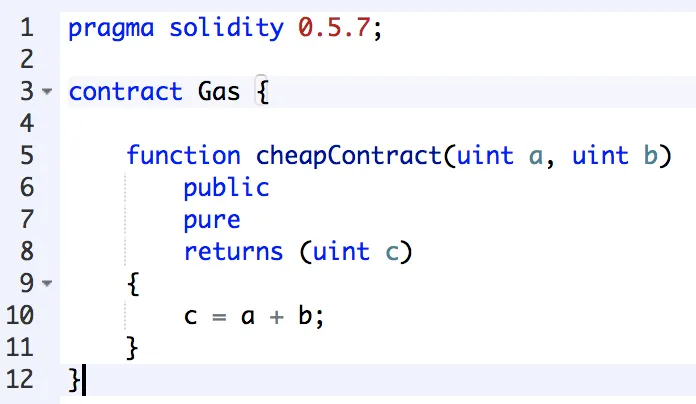
Now you can deploy it in the compiler and input any two numbers to get the integer ‘c’. To check the price of our transaction we should take a look at the terminal located beneath the code section. There is a transaction cost and an execution cost. The first one refers to how much data a transaction has. The second one refers to how much of EVM’s power was required by the transaction.

This is an extremely basic transaction that costs almost nothing for the network. In writing meaningful smart contracts you will add more details, which will increase their weight and therefore transaction fees.
Creating & deploying your own ERC20 token
Let’s face it, the majority of the blockchain developers that are just starting out are eager to play big and create their own blockchains and tokens. While this is an extremely difficult topic that attracted some of the best software engineers from other spheres, building a basic ERC20 token isn’t rocket science.
First, we need to create another file in Remix and uploading the ERC20 interface, which is the following:

The ‘totalSupply’ function lets us see how many tokens we have in total. The ‘balanceOf’ function is used to get amounts of tokens on specific addresses. The ‘transfer’ function allows users performing transactions between each other. The ‘transferFrom’, ‘allowance’ and ‘approve’ functions are there to allow people to let some other users initiate transactions on their behalf. Events are the logging tools for the ledger.
In addition to the interface itself, we will need a separate .sol file for our new token. Here we will import the ERC20 interface and specify our token’s symbol, name, and decimals.
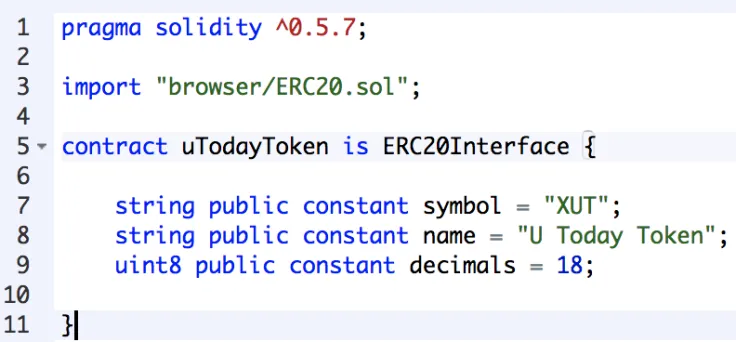
Before we compile it, we need to specify constraints.
-
Let’s start with the total supply – it’s a constant integer variable that we will make private. The total supply of our tokens will be 1 million, we also write a function to return this value.
-
Second, we need to store our token somewhere. For this, we will need to outline the mapping that will return a balance for any address specified.
-
Third, there should be a function for token transfers, which will essentially have an address of a receiver and an amount of token transferred. This function should also be able to check whether or not a sender has enough tokens on their balance, which can be realized through a simple if/then statement. In addition, we will set conditionals for ‘_value’ in a way that blocks users from sending transactions with 0 tokens as this would only flood the network with junk.
-
Fourth, we should create the mapping for the remainder functions, which is a mapping of mapping to an integer.
-
Then we will specify a few checkers in the ‘approve’ and ‘allowance’ functions and put conditions for the ‘transferFrom’.
-
Finally, not all the tokens will be available on the market. Some of the tokens are usually left out for teams, foundations, advisors and other purposes. Hence, it’s essential that we make it clear how many tokens will be circulating. As we created the tokens, the circulating supply equals our balance.
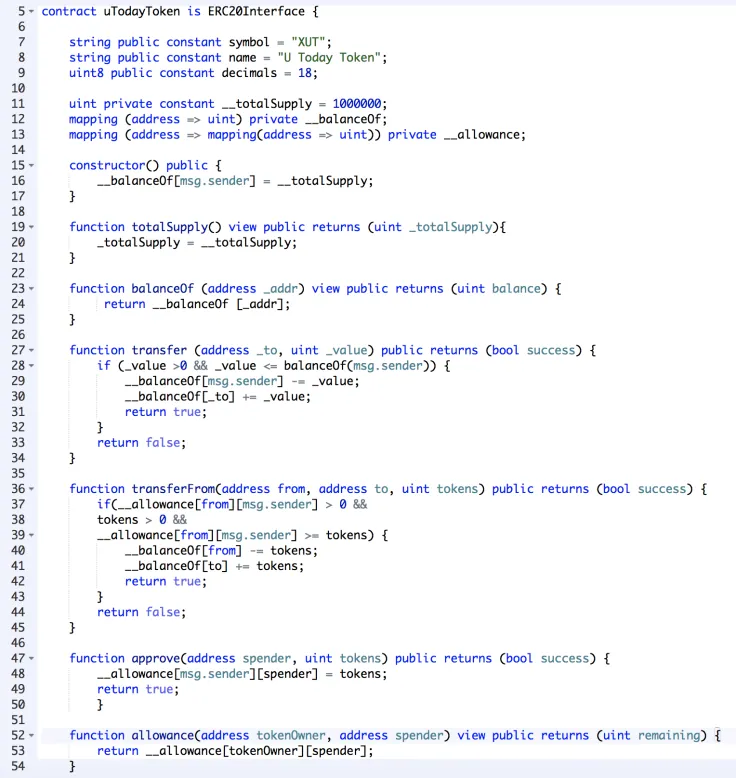
The code is ready, so let’s test it. Proceed to the ‘Run’ tab of the compiler and deploy our token contract. You will see that we have our token data along with the total supply, balances, and allowances. Congratulations, you deserve a pat on the back!
To make our token actually function on the network, we need to deploy the smart contract (note that this is different from deploying it for testing in Remix). For the sake of this tutorial, we will use Remix and Metamask, but there other ways of doing so. Metamask is a simple but efficient Ethereum wallet program with a nice UI that integrates as an extension to some of the most popular browsers. In our case, we will use Opera. Firstly, go to metamask.io and download the extension. Once it’s done, you will see a fox icon in the top right of your browser.

Press on the icon and proceed through the offered instructions to create a wallet. Do not forget to store the secret phrase! When you have your wallet, press on the Metamask icon and change the network to ‘Ropsten’ because we don’t want to mess with Ethereum’s mainnet.
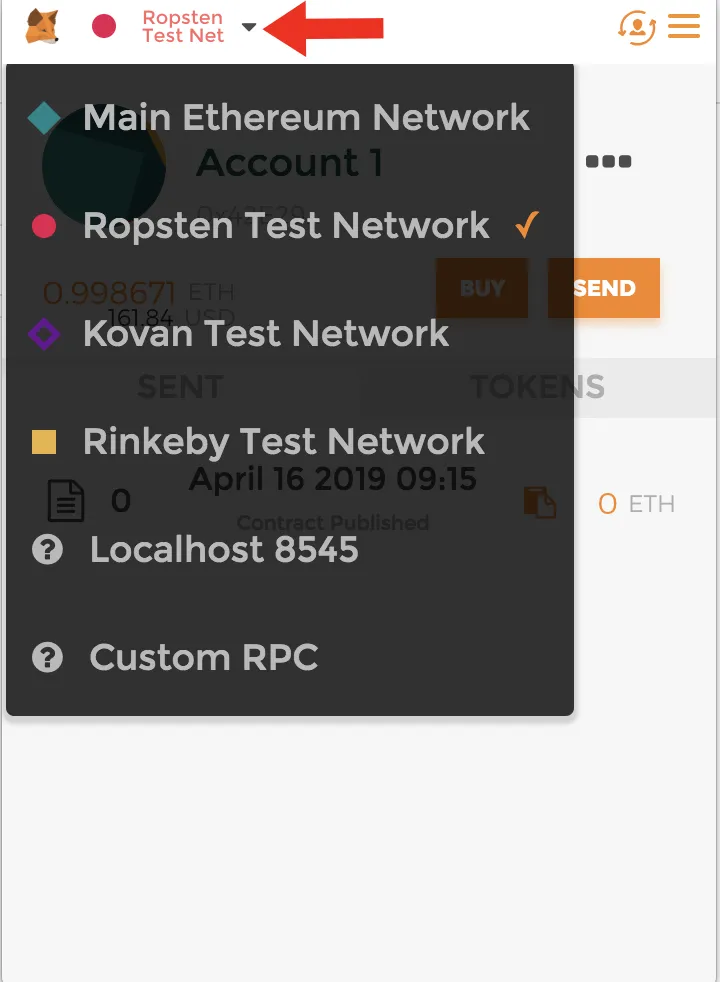
The last step is to generate some Ether (unfortunately, you won’t be able to use these for any real purchases, but they are necessary for testing). Head over to faucet.metamask.io and request 1 Ether.
Now you are all set. Return to your Remix window and change the environment to ‘Injected Web3’ in the compiler. Take a look at the account tab too – your address should be the same as that of what you generated with Metamask. Select the smart contract you want to deploy, which is your token contract and not the ERC20 interface and press on the respective button. A Metamask window will pop up with a transaction, its details, and options to interact with it. Submit the transaction, and our token will come into life.
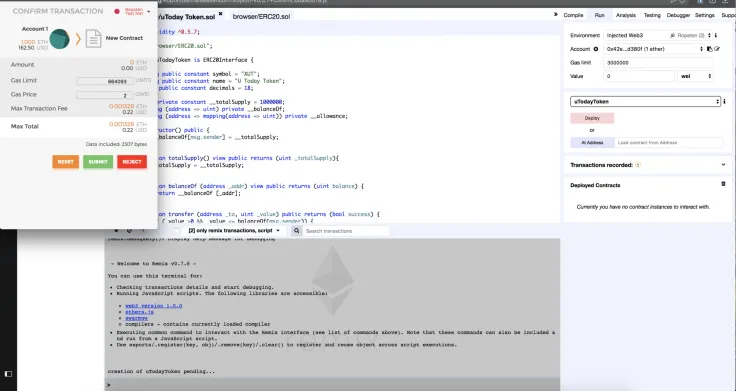
You can now play around with all the functions we specified earlier. Let’s look at our contract from another side to verify that it works properly. Like any other blockchain, Ethereum has multiple block explorers which serve the essential purpose of monitoring what’s happening on the network. In our case, we will stick to etherscan, though there is a handful of other great alternatives. Note that if you just go to etherscan, you will see the Main network. As we need to see the Ropsten network, you will need to put ‘ropsten.’ before the website’s address. Search for your address and you will see two transactions – one is for free Ether you received, and another is for deploying the contract.
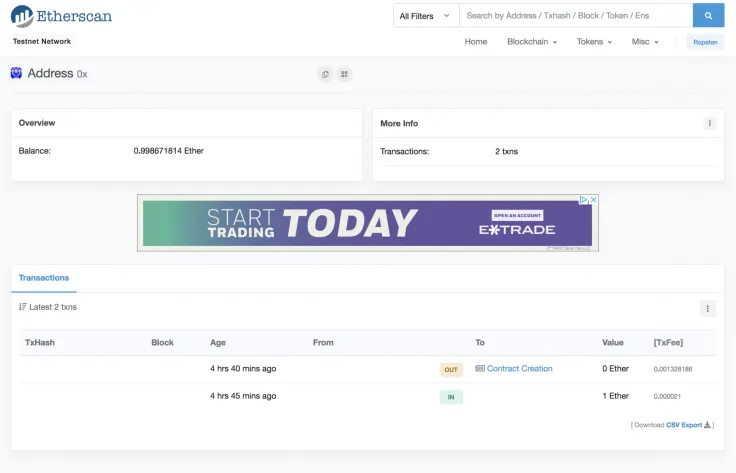
To find the address of your contract, press on the TxHash and navigate to the ‘To’ field. Here you can check your smart contract’s transactions, code, and events. At this point, we need to verify and publish our contract. Go to the ‘Code’ section and click on the ‘Verify and Publish’ link. Here you will need to again specify the name of your token, the version of the compiler (in our case the latest version of Solidity we used was 0.5.7, so we will stick to the related compiler version). Now you should copy the token’s smart contract code along with the ERC20 interface code from your Remix window to etherscan and press ‘Verify and Publish’ at the bottom of the screen.
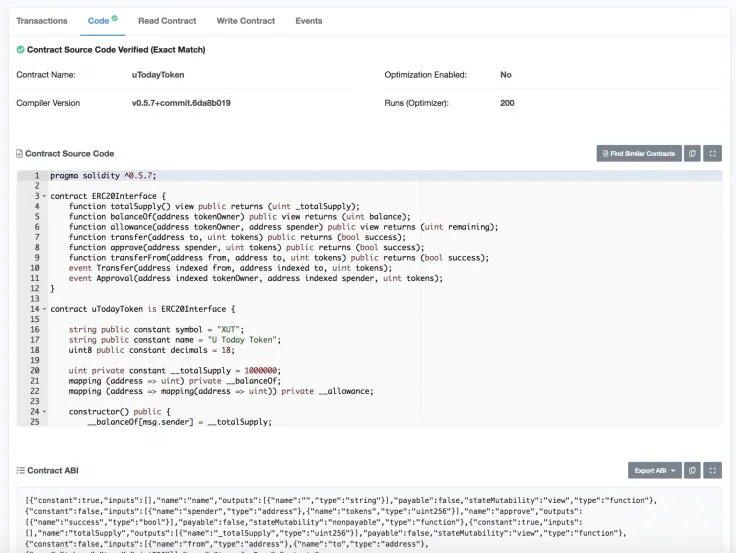
It’s time to go back to your contract’s address. The code in the ‘Code’ tab will now be verified. In addition, you will now have two more tabs: ‘Read contract’ & ‘Write contract’. In the reading section, we can check the functionality of our token. Input your (not the contract’s) address into ‘balanceOf’ field to see how many tokens you have; it should show 1 million that we hard coded as the total supply and gave it circulating to our wallet. That means that our token is now correctly working on the testnet.

Summary
If you are looking to start a career in the crypto industry, you need to understand that despite its relative simplicity in basics, blockchain has incredible deepness to it. Since 2017 blockchains have evolved significantly and their use cases went beyond just financial transactions. With the advent of Ethereum, a whole new layer of networks appeared that hosts various dApps and blockchain-based solutions. The tool behind this evolution was a smart contract, and if you want to make your experience more valuable and future-proof, you should know how one works.
While you can code smart contracts using other languages, Solidity is a better fit for such a purpose. Moreover, if you want to become an Ethereum developer, or create an ICO/ERC20 token for your project, this is your go-to choice. If you had some experience with C++ or JavaScript, coding on Solidity should be relatively easy. You will have to understand some differences between the client-server and decentralized models of launching software, though. Thanks to Ethereum Foundation and some third-party organizations, developers are presented with a set of convenient tools like Remix and Etherscan to code and deploy smart contracts.
We hope that our tutorial helped you with getting around the majority of Solidity’s concepts to be able to start your blockchain journey. Remember that you can always check with the latest documentation on Solidity. We wish you good luck and will be happy to use some of your dApps someday!
 Godfrey Benjamin
 Yuri Molchan
 Arman Shirinyan
 Gamza Khanzadaev
 Tomiwabold Olajide