
I. Project and Airdrop campaign information
Xpool is an open-source liquidity protocol built on the BSC (also known as Binance Smart Chain), allows users to borrow assets from the platform and adds liquidity to the exchange by depositing assets into Xpool, thereby fostering higher potentials to earn profits from your own assets.
Details of Xpool Testnet airdrop campaign
-
Total XPO reward: Upto 2,100,000 XPO (Up to 2,100,000 XPO (This fund is used for all of Listing/Airdrop campaigns, this Xpool alpha testnet is one of those). Depending on the amount and price of XPO token, the amount of XPO released for each Airdrop will be decided at the end of campaign).
-
Airdrop time: March 31st, 2021 to 10:30 PM (GMT+8) on April 04th, 2021
-
Reward timeline: 3 days after XPO IDO program, we will check and summarize the result of Xpool alpha testnet. After that, depending on the amount and price of XPO token, the amount of XPO released for Airdrop will be decided. The lucky users who receive reward from the Airdrop campaign will be SELECTED RANDOMLY among those following exactly the testnet instructions below.
-
Reward method: We will send the Airdrop reward for you to the BNB wallet address that is connected with Xpool testnet. The testnet wallet address is the same as the mainnet one, so when we release the reward, you only need to switch the network from BSC testnet to BSC.
II. How to join Xpool testnet to get reward from Airdrop campaign
-
Steps for preparation
Step 1: Open Meta Mask on Google extension and swap your network on Meta Mask to BSC testnet. You can follow our instruction below:
-
Go to setting page by clicking on profile picture
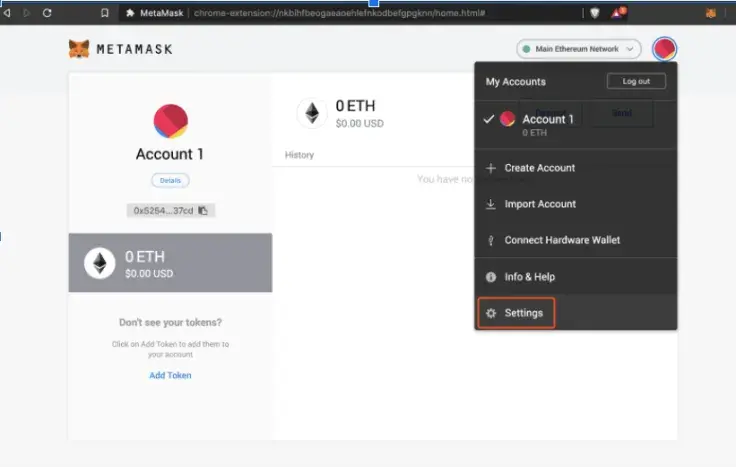
-
In the Settings section, choose [Network] then enter [Add Network].
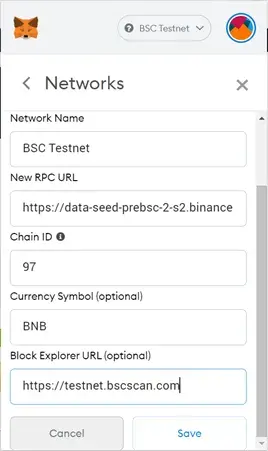
To connect with BSC testnet, you need to fulfil this form below:
-
Network Name: BSC Testnet
-
New RPC URL: https://data-seed-prebsc-2-s2.binance.org:8545
-
ChainID: 97
-
Symbol: BNB
-
Block Explorer URL: https://testnet.bscscan.com
The last step is click [Save] to fill in the information above.
Besides, you can refer other RPC URL at page:
https://docs.binance.org/smart-chain/developer/rpc.html
After completing all of these steps, you have successfully connected to the BSC testnet network.
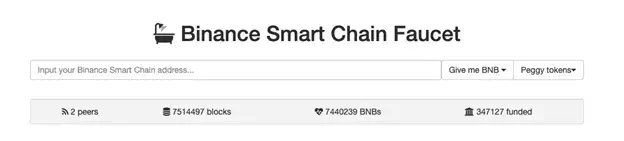
Step 2: Firstly, you need to have BNB on the Binance Smart Chain testnet network to pay fees for all of the transactions arising on Xpool.
To own BNB testnet, please copy your BNB address wallet and send to this link: https://testnet.binance.org/faucet-smart .
Then click [Give me BNB], choose [6.25 BNBs].

-
Steps for using XPool testnet
You have two ways to participate in Xpool testnet and get reward after the campaign ends. If you complete both 2 ways, you will receive more XPO tokens.
Way 1: Test as lender
Step 1: Access to Xpool testnet via: https://testnet.xpool.app/
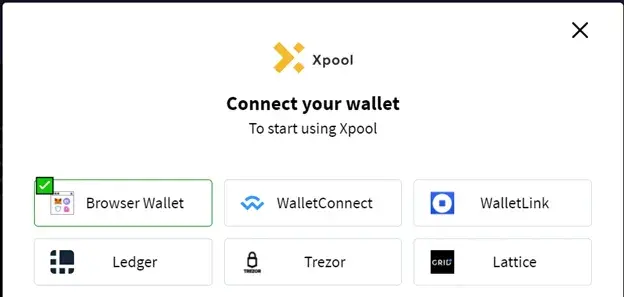
Step 2: Connect your Meta Mask wallet to Xpool system by clicking [Connect wallet].
Step 3: You should choose [Browser Wallet]
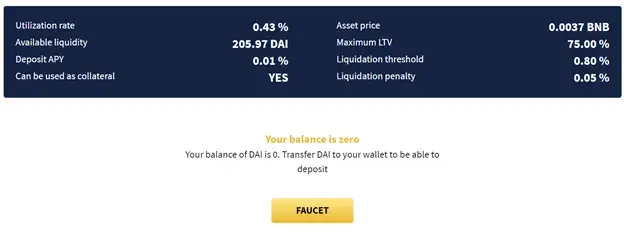
Step 4: Firstly, you need to faucet stable coins such as USDT, SUSD, USDC, DAI ... to receive free coin to test on Xpool
-
Click the [Deposit] section then choose the stable coin you want to faucet.
-
Next, enter [Faucet], after confirming your transaction in Meta Mask, you are free to claim this stable coin.
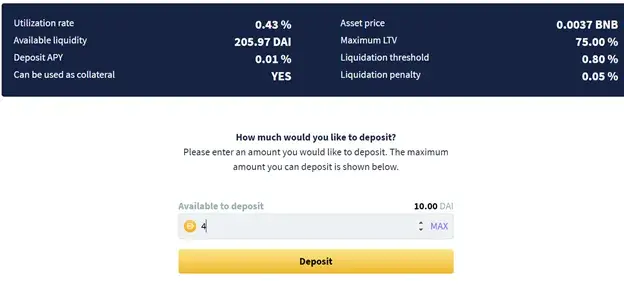
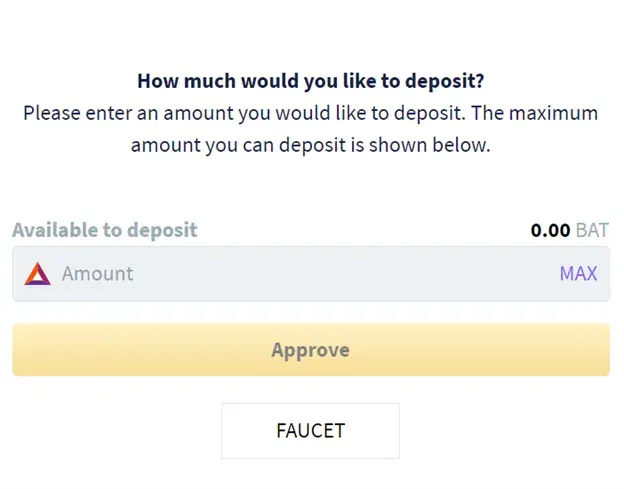
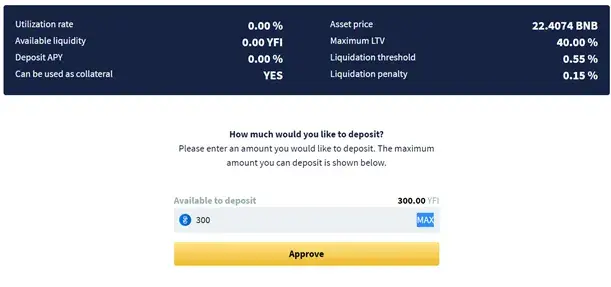
Step 5: Now you can deposit your assets to Xpool by inputting the amount you want then click [Approve], then click [Confirm] on your Meta Mask wallet to confirm your transaction.
Noted: If this is your first time using this token you'll need to perform two transactions. The first is to approve the Xpool smart contract to withdraw your tokens from your wallet and the second is to perform the actual transaction.
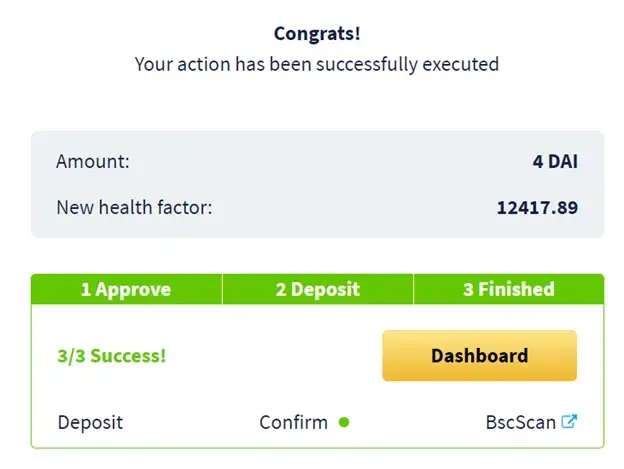
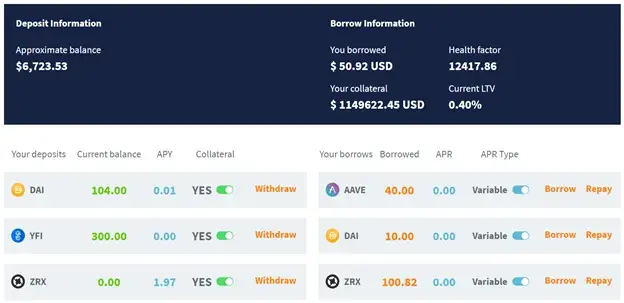
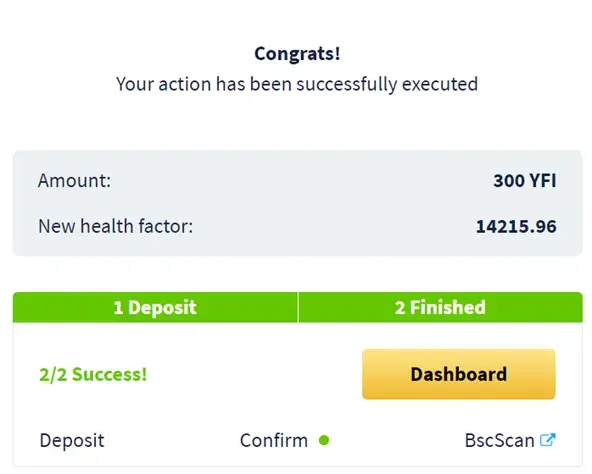
Step 6: After confirmation on your Meta Mask, you have successfully deposited the asset to Xpool. You can check your balance at the Dashboard section.
Step 7: Wait for 1 day in order to receive interest from Xpool, then withdraw your token and interest from Xpool.
-
To implement [Withdraw], you need to go to the [Deposit] section in the dashboard and snap on [Withraw].
-
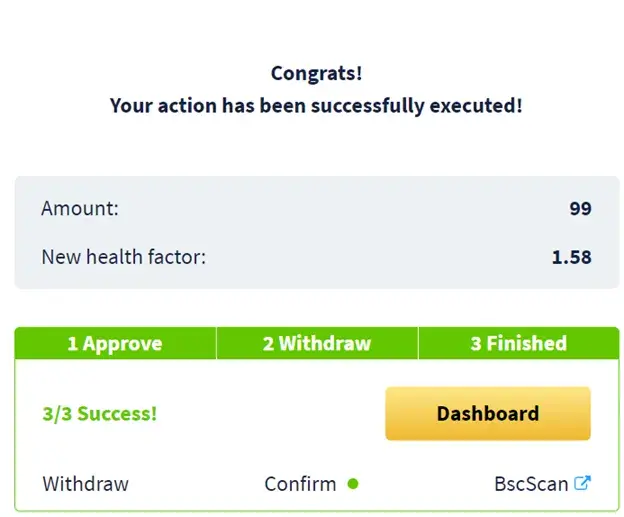
Select the amount to withdraw and click [Continue] to process the withdrawal transaction
-
You can check your transaction hash at BscScan and manage your new balance in XPool at Dashboard section.
Way 2: Test as a borrower
Step 1 and Step 2: (Same as way 1)
Step 3: You can faucet any tokens in Xpool to claim tokens for free.
Step 4: Click [Deposit] on the menu bar, choose the asset you want to deposit, then enter the amount you want and click [Approve].
After confirming the transaction on the Meta Mask, you wait for a few seconds for the transaction to succeed.
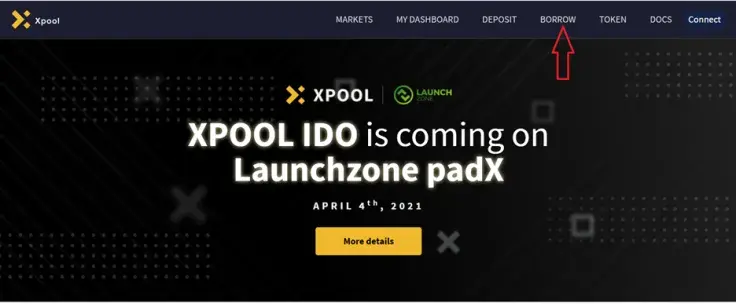
Step 5: Click the [Borrow] section on the menu bar.
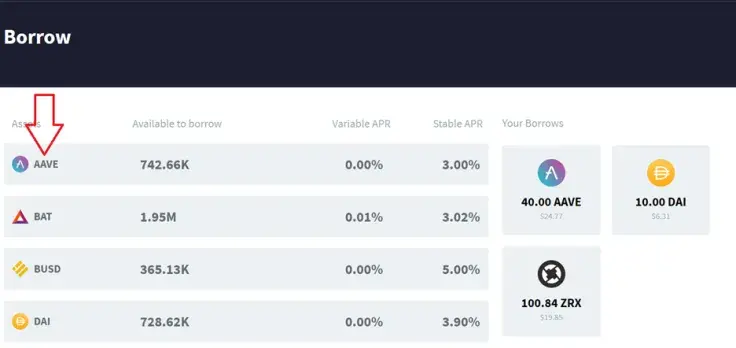
Click on the currency you want to borrow.
Please enter the amount you would like to borrow, then click [Continue]. The system will show you the health factor index of the loan.
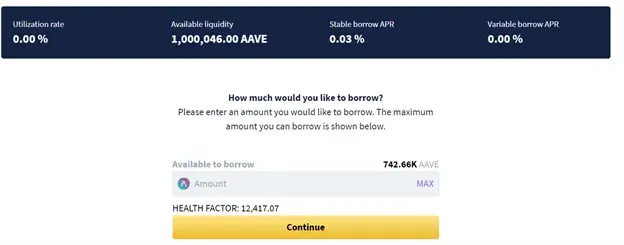
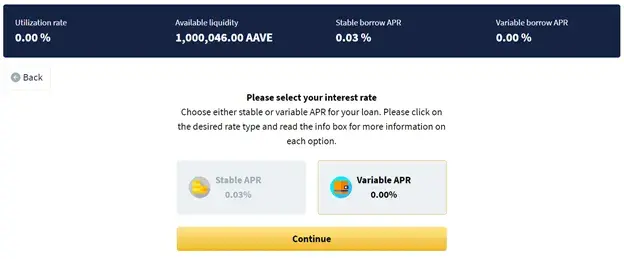
You can choose either [Stable Rate] or [Variable Rate] for your loan, then click [Continue].
Click [Borrow] and confirm on your Meta Mask wallet to complete the borrow process.
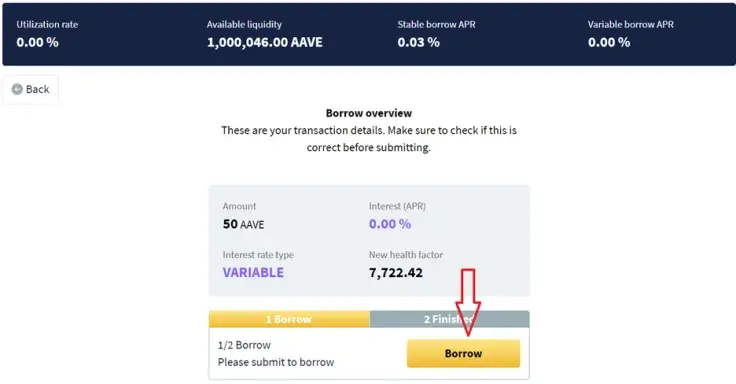
Now you have borrowed successfully.

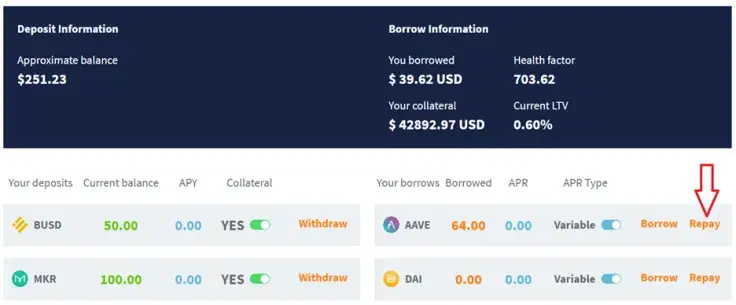
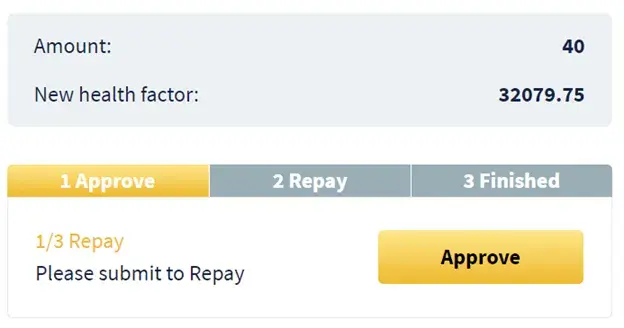
Step 6: To repay your asset, you need to go to the [Borrow] section in the dashboard and snap on [Repay].
Please input the amount of borrow asset you want to repay, then click [Continue]
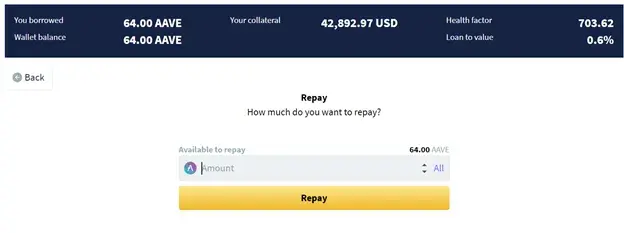
The system will show you the statistics about the transaction, please check it carefully and make sure that it is correct, then click [Approve] to confirm your transaction.
Click [Repay] to finish your repay process.
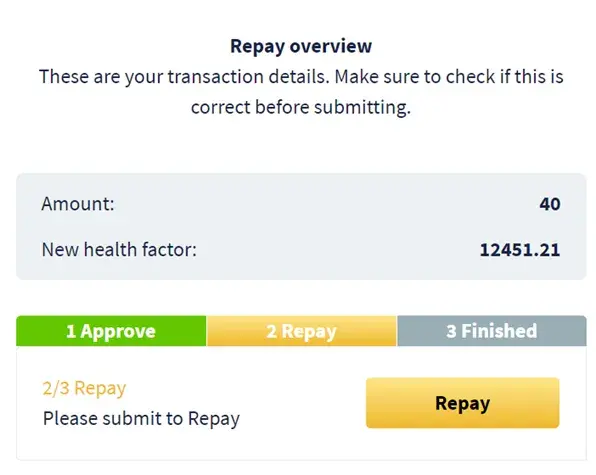
After confirming the transaction on your Meta Mask, you have repaid your loan successfully. You can check your transaction hash at BscScan.
Step 7: The last step is withdraw your assets from Xpool. You need to click [Dashboard] on the menu bar, then in [Deposit information] section, click [Withdraw].
Select the amount to withdraw and click [Continue] to process the withdrawal transaction. You can check your transaction hash at BscScan and manage your new balance in XPool at Dashboard section.

Conclusion
Your transactions arising on Xpool will be saved and stored on Binance smart chain that helps the Xpool team check all of the cases which meet their requirements. Rewards from Xpool Airdrop campaign will be given to those who complete all of the step-by-step testnet introductions.
In summary, we hope that with this detailed tutorial you can join this program easily and get more XPOs from the Airdrop reward campaign.
Follow to update the latest news:
Website: https://xpool.app/
Twitter: https://twitter.com/Xpoolofficial
Telegram channel: https://t.me/xpoolofficial
Telegram group: https://t.me/xpoolofficialgroup
Medium: https://medium.com/@Xpool
Disclaimer: This is sponsored content. The information on this page is not endorsed or supported by U.Today, and U.Today is not responsible or liable for any inaccuracies, poor quality, advertising, products or other materials found within the publication. Readers should do their own research before taking any actions related to the company. U.Today is not responsible, directly or indirectly, for any damage or loss caused or alleged to be caused by or in connection with the use of or reliance on any content, goods or services mentioned in the article.
 Dan Burgin
 U.Today Editorial Team